First let me ask you a question: Ear warmers or headband?
My interpretation is that ear warmers are for keeping our ears warm during cold months; and headbands are for keeping our hair away from our faces. The other difference in my opinion is the material we use for them. Ear warmers are thick(er), headbands are thin(ner). I would also say that when I make/design ear warmers, I make them wider to cover my ears.

What inspired me to make the ear warmer?
I designed the Falling Leaves sweater, and I really liked the pattern. The texture is great, so I thought I need a matching hat as well. So the Falling Leaves Hat was born.

After I finished with the hat, I got thinking: I should probably make ear warmers, too for everybody who lives in a milder climate, and/or prefer ear warmers instead of hats.
The yarn:
Let's talk about the yarn I used for all 3 of these projects (well, 4, because the Falling Leaves Scarf crochet pattern is also coming soon). I used Caron Cloud Cakes. It's a medium (#4) yarn, and it's 100% polyester. I love the fact that It's machine washable and dryable. The Cake is 8.5oz/240g and 760yds/695m. It's a really soft and warm yarn, and it has a lightly brushed look, which I LOVE! It reminds me of mohair and it's so comfortable, not itchy.

How many yard/meter do you need to make your Falling Leaves ear warmer?
- Newborn - 6 months: 16g/49m; 0.55oz/53yds
- 6 months - 3 yrs: 20g/56m:0.70oz/61yds
- 4 yrs - teens: 30g/90m: 1oz/100ds
- Adults: 36g/104m: .30oz/115yds
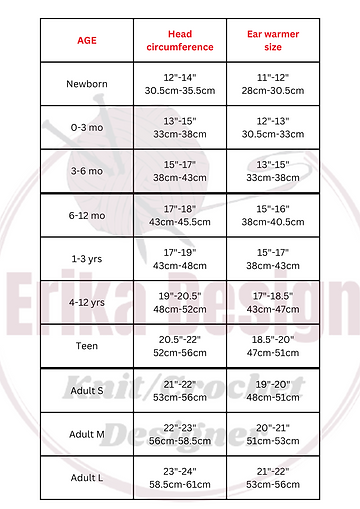
Let's talk about sizes!
The pattern comes in 10 different sizes, but you can customize it for your preferences. The yarn I made the ear warmer with has a little stretch to it. but be mindful that not every yarn has that. So keep that in mind when you choose your size.
The first table shows the length (circumference) of the ear warmers/ages. The second table helps you find the starting chain number you have to start with, if you want a different height for your project. Then you have to keep going with the pattern until you reach the length (circumference) of the ear warmer..

After you figured out your preferred height of your ear warmer, let's make it!
Falling Leaves Ear Warmer
Skill level: (advanced) beginner
Materials:
Yarn: Medium Weight #4,
I used Caron Cloud Cakes (see the yardage above)
Hook: 4mm (US6)
Other: Tapestry needle, scissors, stitch markers (optional)
Abbreviations (US terms):
Approx = Approximately
Ch = Chain(s)
dc = double crochet(s)
Rep = repeat
Sc = Single crochet
St(s) = stitch(es)
Sp = space
Tch = turning chain
Gauge: 16st and 11 rows = 10cm x 10cm (4" x 4”) 4mm (US 6) hook with the falling leaves pattern (the row number is not that important for this project).
(If you get too many stitches in 4" change to a larger hook size. If you get too few stitches in 4", change to a smaller hook size.)
Falling leaves pattern for the swatch:

ch23
Row 1: (sc, 2dc) in 2nd ch from hook, skip 2 ch, *(sc, 2dc) in next st, skip 2ch, rep from * across, sc in last ch, turn (22st)
Row 2: ch1, 2dc in tch, *skip 2dc, (sc, 2dc) in next sc, rep from * across to last 3 st, skip 2dc, sc in last sc, turn (22st)
Repeat row 2 for about 4.5” (11.5cm).
Notes, Tips PLEASE READ:
- The ear warmer is worked flat
- US crochet terms
- Ch1 at the beginning is the tch, count as a st
- For best result, use the same yarn
- I suggest to use stitch markers for the first and last sc in each rows (especially if you're a beginner)
- Different colours mean different sizes in the brackets. (Take a look at the tables above)
- Have Fun!
Pattern:
Ch 11 (11, 11, 14, 14, 17, 17, 20, 20, 20)
Row 1: sc from 2nd ch from hook and across, turn (10, 10, 10, 13, 13, 16, 16, 19, 19, 19)

Row 2: ch 1, 2dc in same st, skip 2sc, *(sc, 2dc) in next sc, skip 2sc, rep from * across, sc in last sc, turn (10, 10, 10, 13, 13, 16, 16, 19, 19, 19)

Here's the downloadable, printable pattern:
Row 3: ch1, 2dc in same st, *skip 2dc, (sc, 2dc) in next sc, rep from * across to last 3st, skip 2dc, sc in last sc, turn (10, 10, 10, 13, 13, 16, 16, 19, 19, 19)

Repeat row 3 until piece measures approx 12"-30.5cm (13"-33cm, 15"-38cm, 16"-40.5cm, 17"-43cm, 18.5"-47cm, 20"-51cm, 20"-51cm, 21"-53cm, 22"-56cm), turn
Before we finish, here's the legal reminder:
This Pattern is for personal use only!
This pattern and its images are copyright protected and the sole property of Erika Design (Erika Pataki).
Please do not redistribute, transfer, or sell the pattern; do not alter it to claim as your own. You may sell any products you create from this pattern, BUT please credit the designer: Erika Design
Thank you,
Last row: ch1, sc in next st and across (10,10, 10, 13, 13, 16, 16, 19, 19, 19), finish off, weave in ends.
Video tutorial:
Assembly:
If you don't want a twisted finish, you just have to sew the ends of the ear warmer together, and you're done!!!!
For twisted look:
- fold the 2 end in half (facing each other)

2. slide them into each together

3. sew all 4 layers together

4. The sewn side is the wrong side, so turn the right side out, and you're done!

I hope you like your finished ear warmer, and you had as much fun making it as I had. I would love to see your finished product, please tag me on Social media https://linktr.ee/ErikaDesign and please use “#fallingleavesearwarmer”, “#erikadesigncanada”. If you liked my pattern, please leave a feedback on my shop, thank you!!

Comments
Post a Comment