In this lesson I'm going to talk about tension, and I'm going to show you how to do a purl stitch. (Remember, I'm a right handed continental knitter.)
Tension and how to hold the working yarn
Every knitters have their own tension. Some of us knit looser, some of us knit tighter, and that is perfectly fine. We just have to be careful not knit too tight or too loose. At the beginning of our knitting journey most of us knit real tight . I remember I was knitting so tight I couldn't even insert my left needle into the stitch, and it was so frustrating. That's why I always suggest to beginners to use a bigger set of needles, and thicker yarn because it's easier to work with them. When the spaces between our stitches on our needle are the same, when the stitches look neat and nice, that means our tension is good. We have to practice to reach that point.
I knitted a summer top few months ago, and while I was knitting I got distracted so my tension, my stitches became loose and really bad. I had no other choice but to frog (rip back the stitches). Below you can see when the tension is not right. I used the same yarn, I used the same needles, but the difference between the 2 pieces is huge. If you look closely you can see that none of the pieces are perfect but the bottom piece is really bad. Uneven stitches all around, holes between stitches, etc. That's what we don't want.

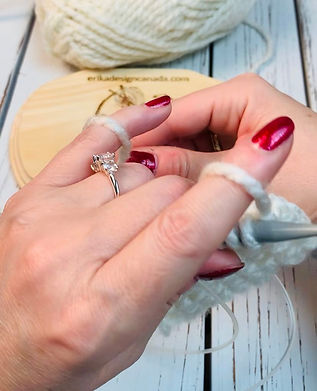
How I hold my working yarn?
I didn't talk about how to hold the working yarn in my first knitting lesson, because I didn't want to confuse anybody, especially my crocheter friends. Every crocheter has their own way of holding the yarn, I don't want to give the expression that what they're doing is not right. I don't think there is a wrong and a right way to hold the working yarn. The important thing is if you can tighten the stitches on your right needle, you're doing it right.
This is how I hold the yarn:

I wrap the working yarn around my left pointing finger at least 3 times and that gives me enough tension, and this helps me create nice a neat stitches.
The other way could be
1. wrap the yarn around your left pointing finger,
2. hold the yarn with your middle and ring finger alongside the left needle,
3. wrap the yarn around your pinky.

Try them out, and use what you like, what creates better tension. I don't like the 2nd way, but that doesn't mean that is wrong or there's something wrong about it.
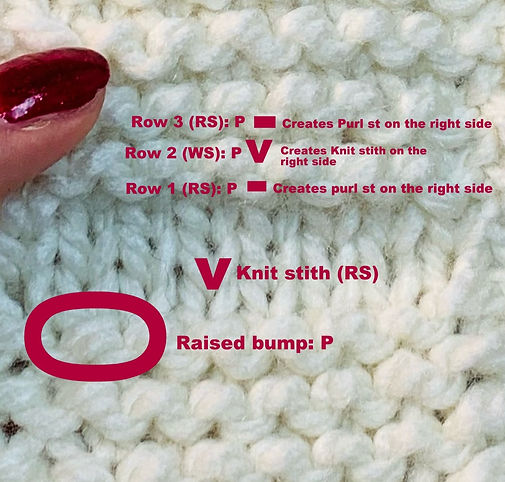
Purl stitch (abbreviation: p)
The 2nd basic knitting stitch is the purl stitch. The purl stitch is the reverse of the knit stitch. What does this mean? It means that when we do a knit stitch on the right side of our work, we create a purl stitch on the wrong side of our work and vice versa. This is why when you're practicing the purl stitch, and you purl on both side of your work (every row), it will look the same as if you would knit every row.
The knit stitch creates a "V" on the right side of the fabric, and the purl stitch is like a bump on the right side.
How to make a purl stitch?
- Put your working yarn in front of your left needle,
- Insert your left hand needle down into the stitch
- Wrap your yarn around the right hand needle creating a loop,
- Pull the loop through the stitch,
- Slide off the stitch from the left needle.
- Repeat
Here's the video tutorial:

Homework:
and practice the purl stitch, so in my next knitting lesson, we can learn how to make the stockinette stitch and a knit 1, purl 1 ribbing. I also want to show you what you can do with your first and last stitches to create a nice and neat edge of your work.
Don't forget to subscribe so you won't miss any of my tutorials.
Don't forget my FB group (Erika Design - Knitting tutorials and more), so I can help you with knitting questions you might have.
Pls tag me on Social Media when you make something after checking my tutorials: https://linktr.ee/ErikaDesign
And last but not least, THANK YOU FOR READING!

Comments
Post a Comment