I bought this really soft yarn at Michaels, and I instantly thought about a nice lace pattern for spring. It's a really stretchy material, I can stretch it twice the size, but it bounce back right away.

After I made this top for myself, I thought I was going to write down the pattern for it. You can wear it in the office with a nice skirt, or you can wear it with jeans. It is my favorite top when I do errands. It's a perfect little top for Spring.
I graded the pattern from XS-3XL.
It starts with a simple (k1, p1) ribbing and continues with the lace pattern. This diamond lace pattern is a very simple pattern, so it's perfect for everybody who knows how to (yo, ssk, k2tog, SK2P).
I used 5.5mm (US9) and 6.5mm (US10 1/2) knitting needles. The gauge is; 15 sts and 24 rows = 10cm x 10cm (4" x 4”) in Stockinette (k on RS, p on WS) with 6.5mm (US 10 ½) needles.
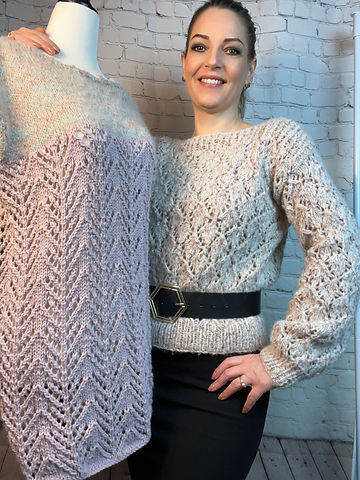
After I finished with the lace pattern I was about to make the neck and shoulders shaping, but I didn't want to make a crown or V neck. With this material and pattern I prefer boat neck.
So, after the lace pattern I continued with (k1tbl,p1) ribbing (for 8cm - 3.25"), the (k1tbl) stitch gives a twisted look, and you don't need to change to your needles to finish with this rib pattern. I shaped the neck/shoulders with short rows. If you're not familiar with short rows you can omit that, and just continue with the ribbing.. You can also make your sweater shorter or longer than the pattern ask you to do, by adding more lace pattern rows, or finish sooner than the pattern says (keep in mind that the top part, the ribbing is 8cm-3.25").
With the short rows, you can create a deeper neck opening for your liking (you can use short rows on both of your panels, or on your front panel only) The (k1tbl) stitch gives a twisted look, and you don't need to change your needles to finish with this rib pattern. While I was knitting the sleeves, I blocked the (front/back) panels. (How to block: https://www.erikadesigncanada.com/post/blocking-your-handmade-projects )

Now it's time for the sleeves. Pretty easy, not many shaping necessary. I wanted to create something that easy but sophisticated. The only shaping (increase) happens after the ribbing, and then you just keep knitting the diamond pattern until you reach your desired length of your sleeves.
Everybody has different length of arms, so it's really important to measure your project before binding off.
What I usually do is:
- pin the shoulders together
- put it over your head (this way I can also make sure the neck opening is perfect)
- pin the unfinished sleeve to the shoulder and check its length
When I finished the sleeves, I blocked them. It's really important to block your pieces before sew them together! You can smooth out the edges, you can even out your stitches with blocking, and you can block the panels to your measurements. Because of the lace pattern you can overstretch it, so be mindful of that!
You should also know that different material act differently when it comes to blocking. My material didn't respond to blocking as much, but one of my testers was able to block her sleeves really wide, so the pattern gave her bishop styles of sleeves. Your tension also can give a slightly different measurements after blocking (because of the lots of yo).
For best result I suggest to use similar yarn that I did: Contents: 66% polyester, 30% acrylic, 4% wool

Here's the finished top, the Little Diamonds top. Hope you like it.
Size: woman
XS: (Bust: 76 cm, 30”),
S: (Bust: 86 cm, 34”),
M: (Bust: 96.5 cm, 38”),
L: (Bust: 106.5 cm, 42”)
XL: (Bust: 117 cm, 46”)
2XL: (Bust: 127 cm, 50”)
3XL: (Bust: 137 cm, 54”)
Skill level: Advanced
Materials: Yarn: DK #3, I used Loops&Threads Cozy Wool Tweed approx.
XS: 291g/728m, 10.25oz/796yds
S: 300g/764m, 10.4oz/836yds
M: 347g/867m, 12.25oz/948yds
L: 385g/964m, 13.5oz/1054.25yds
XL: 438g/1095m, 15.5oz/1197.5yds
2XL: 485g/1212m, 17oz/1325.5yds
3XL: 524g/1310m, 18.5oz/1432.5yds
The pattern is available on my Etsy, Ravelry (check the QR code or my Linktree)
Don't forget to subscribe so you won't miss any of my tutorials/patterns/etc.
Don't forget my FB group (Erika Design - Knitting tutorials and more), so I can help you with knitting questions you might have.
Pls tag me on Social Media when you make something after checking my tutorials: https://linktr.ee/ErikaDesign

Thank you for reading,

Comments
Post a Comment